

The below details what other stuff I have done, I'll add other bits as I do them.
AWNING
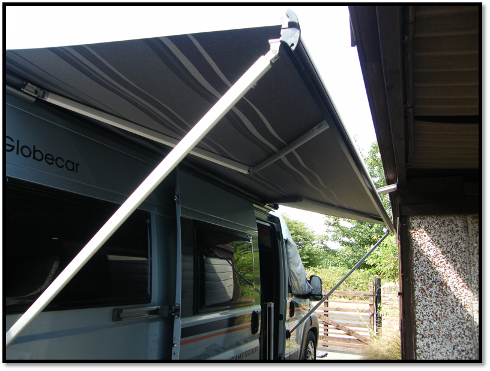
We moved the Fiamma F65S black awning from our Familyscout to our new Campscout which, although not particularly difficult, was a bit time consuming due to gently persuading the 3 securing plates to come off the Familyscout which they were stuck on well, then cleaning them up before sticking them to the Campscout and sitting the awning on them, of course the Familyscout roof also had to be cleaned up too which took even longer!
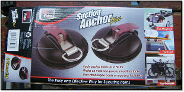
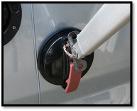
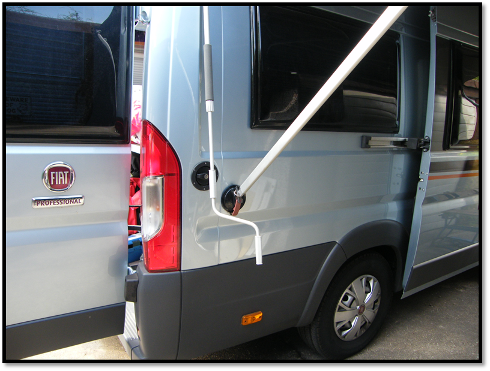
I wanted a way to secure the awning feet to the side of the van when it's open so that we don't have to hammer pegs into the ground to keep it 'anchored' for when we're on a hardstanding as this isn't possible (eg concrete), but I didn't want to fasten the supplied Fiamma wall brackets to the camper (difficult due to the exterior plastic trim anyway). I therefore bought some large suction clamps with metal loops on which easily 'stick' to the side of the camper and the legs slot into them perfectly! I'll further secure it with some strong flat elasticated straps which hook to the top of the legs at the front of the awning and hook under the camper bodywork, just in case we get a sudden gust of wind!
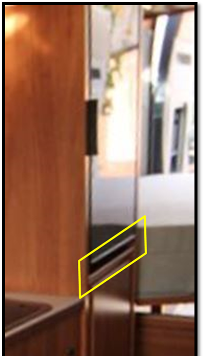
SLIDING DOOR STOP
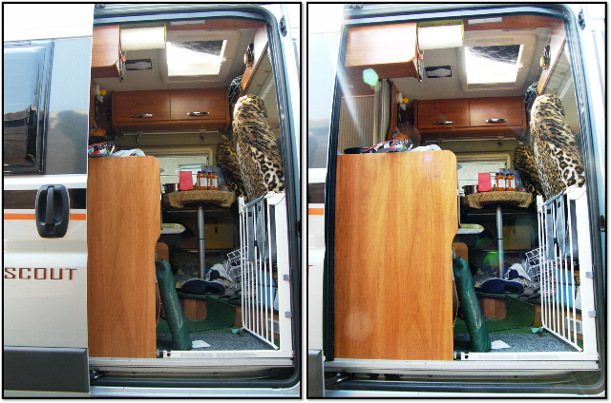
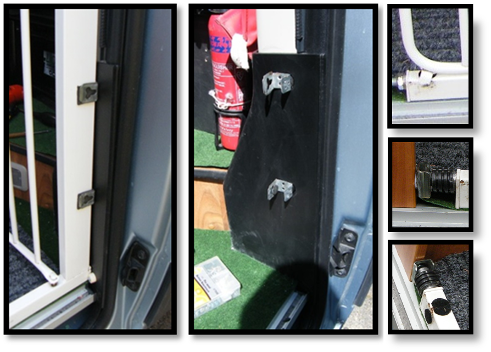
Globecar put a stop on the bottom of the sliding door rail to restrict how far back it can slide to prevent it hitting the rear window (when its open) however the placement of this stop on our Campscout was unnecessarily restrictive, consequently I've moved it as far back as I can so it now opens much more (about 8-10 inches) but it still stops before the window so no risk of damaging it.
The photos show the original opening distance and the new wider opening.
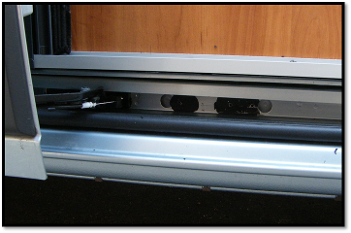
I first unbolted the bottom runner from the door (3 bolts - loosening each a bit in turn until they were all out), ensuring the bottom of the door was supported whilst I did so. Once free I gently pushed the door backwards out of the way whilst I removed the stop which was a bit of a s*d as not only did it have 3 bolts in, but it was well stuck on with mastic, but I managed to do so with a small chisel (with the bevel facing away from me), hammer and wallpaper scraper carefully cutting through the adhesive. I re-fitted the stop further back by using a conveniently placed hole and a new bolt (the hole was a bit larger), drilling holes for the other 2 original bolts. I fitted the stop bedding it on new mastic then put the bottom runner back on the door ... remembering to pull the door forward of the stop first! The picture shows the mastic area where the stop was originally and it's new location.
STORAGE
Underbed area
I wanted to make better use of the underbed space, not only the larger open 'boot' but a virtually inaccessible area to the left behind the gas locker and a large wasted area at the back on the right.
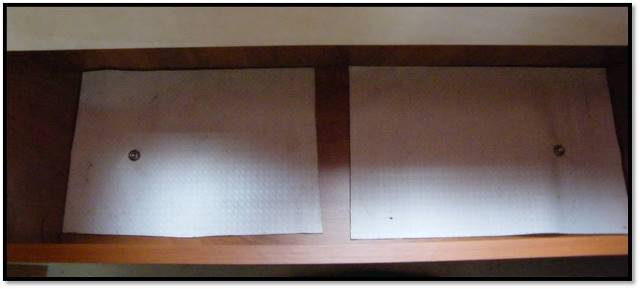
Hidden storage hatch
The area to the left (outlined in yellow) had a small access slot at the top measuring 15cm high x 35 cm wide approx, through which the electric consumer unit (RCD, fuses etc are accessed) with the rest of the space below being inaccessible.
To make use of this wasted space I bought a white service hatch (meant to access services etc in cavity walls) which was sprayed with black paint to make it blend in better. I extended the existing opening downwards with a jig saw then mounted the hatch by drilling holes through the inner sides of the frame into the boarding, screwed it in place being careful not to distort it, attached a handle to make it easier to open the door and inside I fitted a basket over the wheel arch. The space is now fully accessible and usable, ideal for stuff that I need to take with me (eg spare bedding, electric bits etc) but which I don't often need access to.
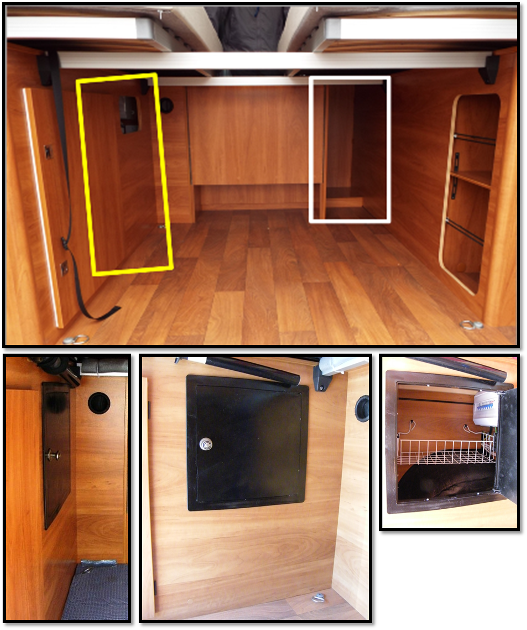
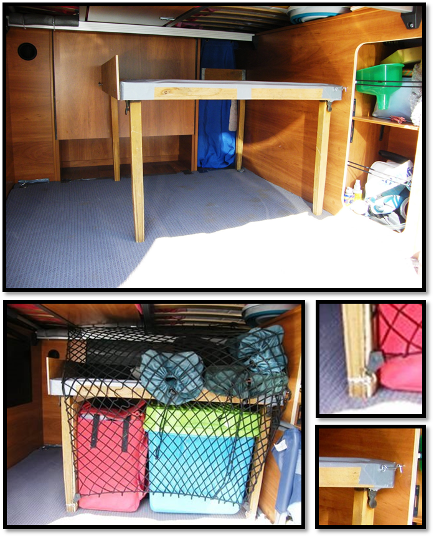
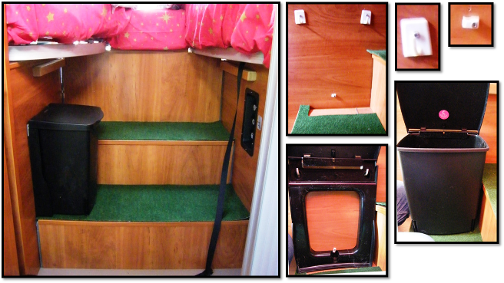
Laundry bin
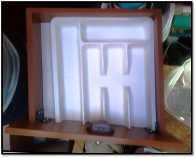
I used the wasted space on the right (outlined in white above) for a laundry chute, this allows dirty washing to be slid under the bed base and dropped into the bag and can be forgotten about until back home!
To make the chute I used a strong large lidded oblong storage tub with a good lip all round the top which I cut the base out of. Next I cut an oblong hole in the boarding below the bed very slightly larger than the width/length of sides of the tub, but smaller than the tub lip, I placed sealant round the underside of the lip and fitted it in place over the hole.
The laundry bag (an old awning storage sack) has hoops around it's top and is kept in place on several cup hooks - as it reaches the floor there will be no weight on the hooks themselves and it can be washed with the rest of the laundry too.
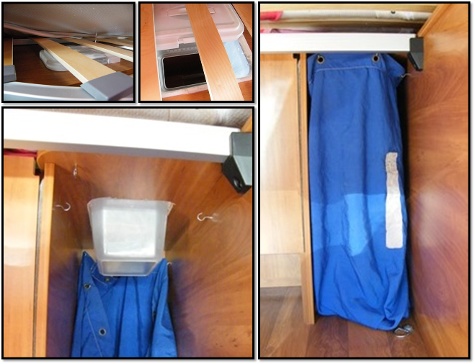
The lid of the tub slides on and off so hopefully will keep the whiff of smelly socks at bay!
Storage platform
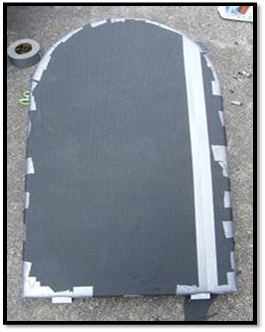
I wanted to make more efficient use of the underbed storage area and make it easier retrieve items so considered various options but then remembered I had an old folding card table, which, with a little modification, would be perfect!
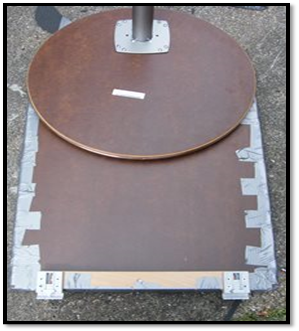
I reduced the height by 20cm which still left clearance underneath for a storage crate and maximum storage space above for chairs etc. To stop stuff sliding about I stuck rubbery Yoga matting on the top, screwed panels on the end and left sides of the top, and underneath on the inside of the left legs slotted a board to stop items moving sideways - this isn't fixed so can easily be removed to allow the table to be taken out and folded.
I used 2 hook/eye fastenings on the upper side of the table (1 at the right front side, 1 at the rear left) which, along with the rear right leg which hooks tightly behind the existing floor securing ring, ensure it cannot move in transit. I cable-tied key ring hoops at the bottom of the 2 front legs and at both sides of the rear under the bed bases and hooked a large elasticated net on to secure items. I can quickly and easily remove the table and fold it to store elsewhere if I need to transport larger items, or use it outside on site.
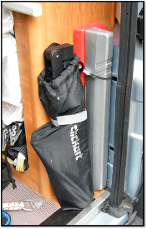
Emergency triangles and trolley
At the rear of the camper just inside the offside door I store the two emergency warning triangles (in the plastic cases) along with a compact folding trolley.
I also used the inside of both rear doors to store water hoses, table and stool - these are shown in detail on the Services page under Water.
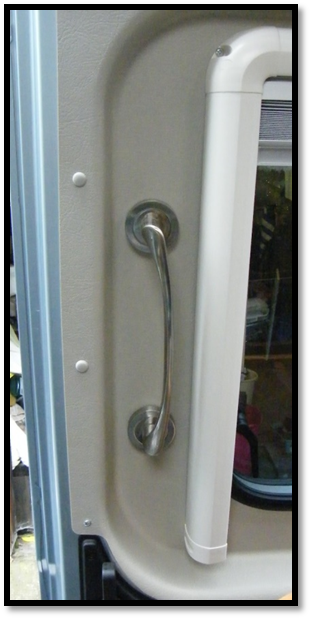
Sliding door handle
I fitted a large chrome handle on the left inner side of the slidingdoor to aid opening andclosing.
Step Storage Improvement
The steps leading up to the bed were already storage areas however the upper one for some silly reason only half-depth, rather than down to the floor which seemed silly therefore I decided to make it full depth so I could use it for tall items such as bottles (lemonade, wine etc) that would be awkward to store elsewhere.
The steps are held on by large black knurled headed threaded knobs - the front one having them on the base, the upper one on the side - so it was fairly easy to remove them but did mean partly dismantling the bed to manoeuvre the rear one out.
The rear step base was held on with screwed brackets as well as being in a channel with 4 screws holding it there, all were removed and I also partly undid others holding the rear panel so that the base could be slid out then tightened them back up to make the surround rigid again.
I cut a piece of plywood to the same width but about 2 inches taller than the height of the gap at the rear of the step and temporarily fitted it using 2 of the original 4 screws to hold it in place to allow me to drill through the other holes and fit nuts and bolts (with washers both sides), then removed the 2 screws and drilled and fitted bolts to them too - I felt this was a better and stronger option that just using screws.
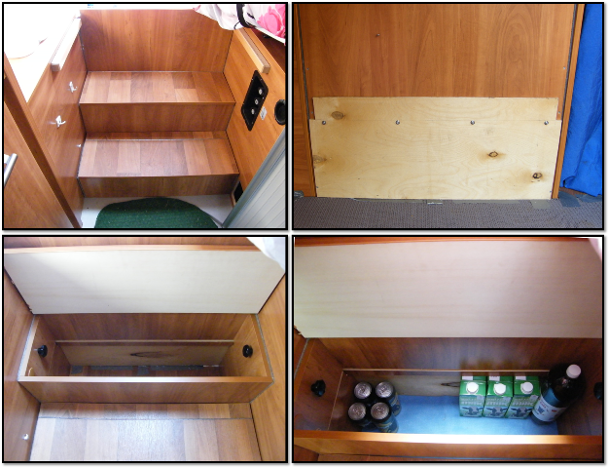
Once I had I fitted the step back into place and screwed the securing knobs back in place I drilled holes on either side through the plywood into the upright supports at either side and fitted long screws - this is to ensure the panel cannot be pushed back by the contents. When refitting the front step I a replaced the 2 large knobs with small headed bolts which makes the space more usable and holds the 2 pieces of non-slip material in place.
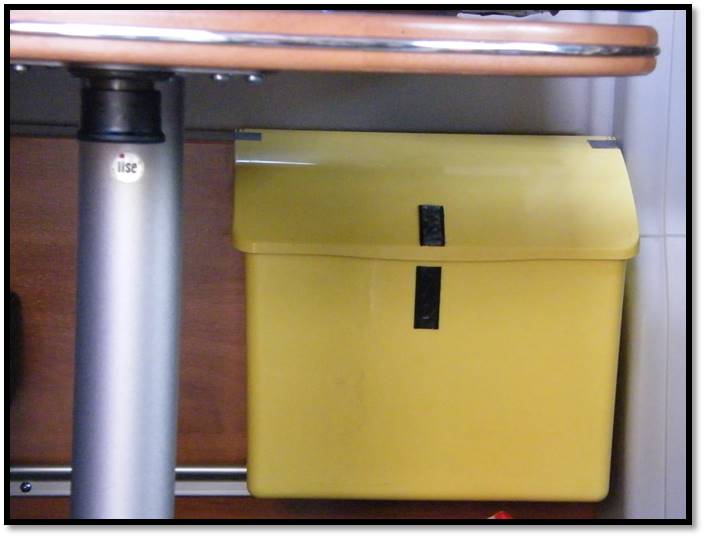
Under table storage
I needed somewhere easily accessible to store dog towels etc so utilised the space under the dinette table by hanging a 'vintage' plastic storage (bread?) bin on a couple of screws (it has slots on the rear for this purpose). This still allows the floor area to be used fully, which is where my dogs sleep, and doesn't impede the use of the dinette seating or the swivelled passenger seat at all.
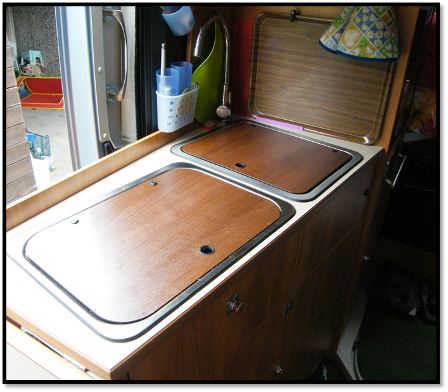
Kitchen
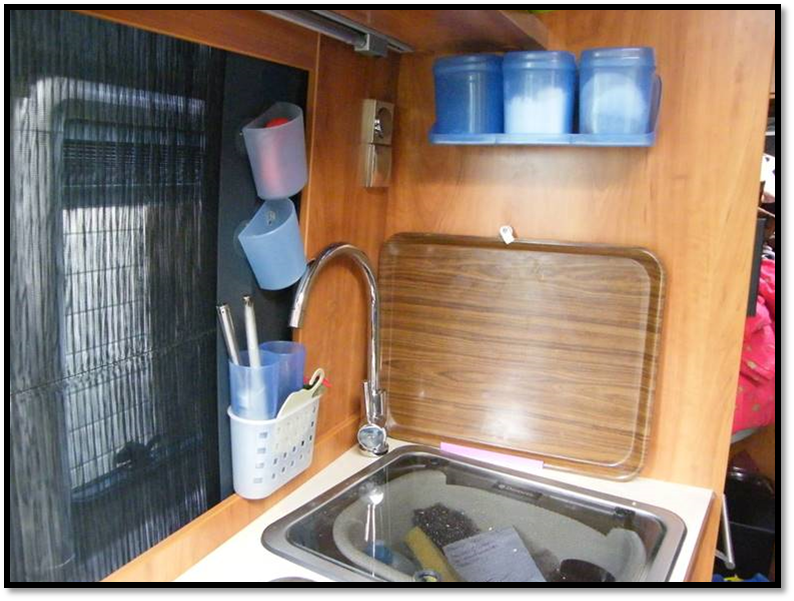
I have a tea/coffee/sugar caddy set with a shelf that I mounted above the sink - I put rubberised grip matt on the shelf and the tubs haven't yet jumped off in over 50,000 miles in various motorhomes and campers!
The large tray below the tubs rests in a plastic channel stuck to the worktop with silicone with a twist clip at the top to keep it secure for travel, behind it I store my thin extra large plastic chopping board. The tray is used to rest the dish drainer on and when stored it protects the wall board whilst cooking.
The 2 small blue tubs 'stick' to the plastic side panel of the mozzie screen with suction cups. The lower white basket is held with one small screw and Velcro on the bottom as it is too big to stay put just with Velcro. The tall blue beakers in the basket serve a very useful purpose ... if the tap accidentally gets knocked on when opening the sink cover the water goes into the beakers rather than all over the worktop andfloor!
I also put some Fablon type self-adhesive covering over the sink and hob glass covers in a nice wood-grain effect, this helps protect them from scratching and also 'hides' the washing-up!
The kitchen drawers have a taper so I cutting down a tray from Ikea to fit for cooking utensils etc, a shallow cutlery tray sits on top of it for knives, forks, spoons etc.
Sliding Door Pockets etc
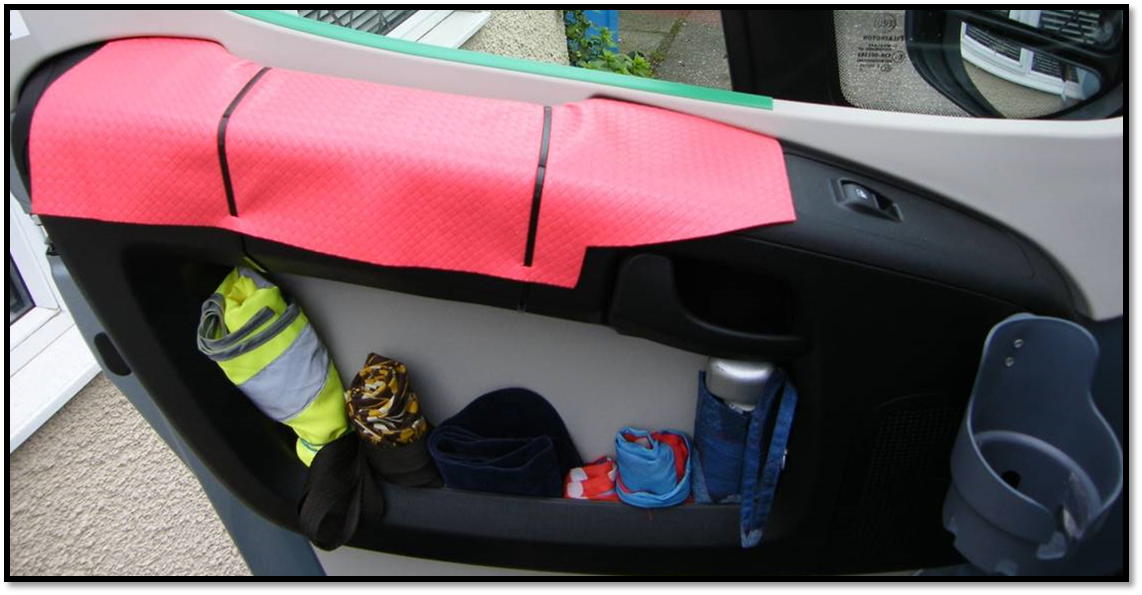
I fitted two plastic storage pockets on the top of the sliding door which are useful for umbrellas, carriers, doggy bags etc. The 'vintage' kitchen roll holder is mounted under the control panel housing - elastic cord looped round the holder with a bobble pushed up against the roll stops it unrolling in transit.


Under Fridge Storage
Under the base of the electric fridge there is quite a large flat area (outlined in yellow on the left) which has made an ideal place to store chopping boards, cooker 'wind break' etc. To stop the items sliding out in transit I used a magnetic door catch and fixed the metal part to the flat surface with adhesive onto which the magnetic catch simply 'sticks' to keep stuff in place, it is quite a strong magnet but can easily be taken off when I want to get at the items.
I hooked a towel rail on top of the cupboard door below the fridge, this also serves as a handle as well. I fitted a magnetic catch to the door/cabinet so that the door doesn't have to be locked with the button to keep it closed when on site.

Wastebin
I used a Brabanta cupboard door bin mounted under the end of the offside single bed over one of the steps, it doesn't affect access to/from the bed and can be easily removed to get into the under-step storage area as the backing plate hangs on 2 hooks at the top instead of the usual screws and to prevent it 'bouncing' off during travel I placed an adapted cable clip at the bottom which can be twisted to release it.
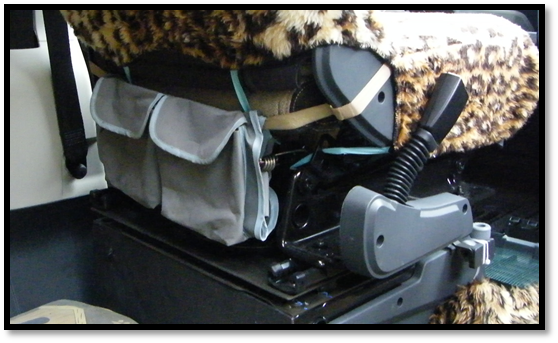
Driver and Passenger Seat Storage
I removed the large protruding plastic cab seat base backs and fitted flat ones which I made (hardboard with black leather stuck on), this gives more space behind the passenger seat for my dogs' beds, and behind the the driver's seat for an old wicker shopping basket (handles removed) for dog leads etc - the basket fits perfectly (held in place with a bungee cord on 2 hooks so easily removed) and the seat can still be fully swivelled.
The grey storage pockets on the back of each seat are a couple of full length seat back storage caddies with 3 rows of pockets which are folded over so only the top row of pockets are visible, these are held in place with large Velcro straps and an elastic bungee cord - with their being only at the bottom of the seat backs they don't cause an issue/catch on anything when the seats are swivelled as they would if they were used as originally intended and hooked over the headrests.
The fire extinguisher and blanket are also located between the driver's door and sliding door so they can be easily reached from both inside and outside of the camper (the extinguisher sits in a bicycle bottle holder).

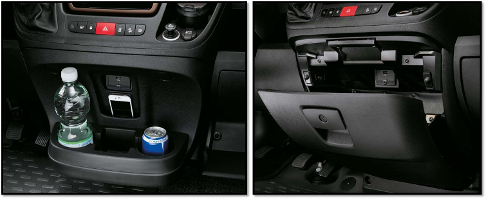
Cab Storage
Our Campscout had a cup holder moulding in the centre of the cab which restricted movement to/from the rear and as we used the drop-down locker in our previous campers for maps, guide books its days were numbered! It wasn't difficult to removed it and put in locker instead, it was just 'awkward' due to the restricted space and I got jammed between the seats several times !
VEHICLE EXTERIOR CHANGES
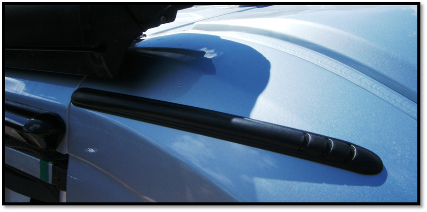
Rain deflector
When it's raining the awning directs water along to the front which then cascades down the side and onto the top of the driver's door which is far from ideal, especially if you forget and get out whilst it's still in full flow, so on the roof in front of it I've stuck on a rubber strip (a 'rubbing' strip usually stuck on car bumpers) to divert the water onto the front of the camper and down the windscreen.
In addition I noticed that the inner seal of both cab doors had water dripping off it onto the door arm/step which means that rain is able to get in past the outer seal - upon checking it I noticed it is cut short by about an inch thus allowing water to bypass it and run along the top of the inner seal. To try to stop this I've stuck extra pieces of rubberised trim at the end of these to extend them to the B pillar so hopefully this will stop water getting in. I've also fitted some 'bling' to the top of the doors in the form of silvered edging trim which again I'm hoping will help to make a better seal between the door and the seal to prevent water getting in ... only time will tell if it works - I might change it for a more 'subtle' bit of trim if it does (I just happened to have this already). Pictures to follow.

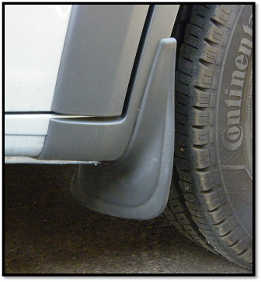
Mud Flaps
We had a new set of non-branded Smart ForTwo mudflaps which we bought off Ebay for around £11 including P&P) which we hadn't fitted to a previous car so hubby decided to see if they would fit the camper ... and they do! He had to make a small bracket (plastic chopping board!) for them but that's all. As they are rubberise they are flexible enough to follow the shape of the wheel arch and look very 'smart'.
Painting Sill
Under the rear side trim the colour of the body could be seen which looked rather silly so hubby decided to spray paint it grey/black, now it blends in and he's gonna do the same on the lower sill along the rest of the camper. This will look better and also 'hide' the clips that hold the rear view camera wiring in place.
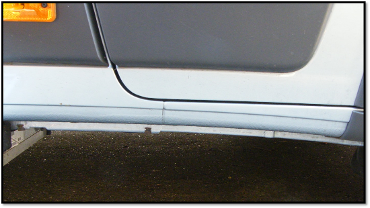
Table Tubs & Window Bars
I put a long plastic basked in the gap between the window and the end of the table for salt & pepper pots etc and a taller leather effect one to the right of the window for table cloths - I just had to remove the plastic ring that the net curtain bottom elastic is usually attached to (I'd already taken them out as we don't use them anyway).
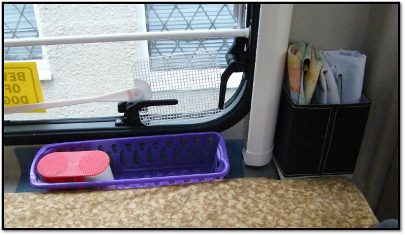
In the picture you can see one of the 2 horizontal bars that I fitted to the dinette window and did the same on the sliding door window; I also fitted an extra one on each of rear door windows. These stop the dogs accidentally falling or being knocked out of the windows when they're open (yes it has happened!) and also means that we can have the windows open knowing that no-one can get in through them (only when we're in the vicinity of course!). They also provides a visual security deterrent too. I used narrow but very strong curtain poles from Ikea and made up some fastenings for each end to keep them securely in place.
Cup holders for beds
Whilst the beds have storage pockets and some shelving there was nowhere tall enough to put a cup/mug so I placed a small removable acrylic shelf on the nearside and a 'fridge door' shelf which hooks on the bottom of the offside overhead locker where there is an existing cut-out in the base, both work a treat.

Curtain Rail / Pole
On the back of the rear upper lockers inside the rear doors I fitted a standard domestic plastic curtain rail with a pair of thermal lined 'velour' type curtains - in winter they will provide additional insulation and keep out the draught if the rear doors need to be opened.
I also put up some voile curtains on a strong sprung cafe-net pole which sits on 2 cup hooks each screwed 2 inches in from the outer edge of the lockers' back panel, by extending the pole fully so it is under tension it touches the sides and stops it rattling. The voiles help to keep the breeze and flying beasties out whilst still being able to enjoy the fresh air.
DOG PROOFING / PROTECTION
Having 3 dogs it's important to protect the camper interior and furnishings as much as possible to save us havingto worry about it and keep the camper in good condition, this is what I've done.
Cab Area
I put rubberised anti-slip mat on the driver and passenger side door arms secured with cable ties, and on the edge of the Remis blind frame I placed plastic trim strips (green), this is to prevent damage/scratches when our dogs put paws on them. I also screwed on cup/bottle holders (see bottom right) as there are none in our camper's cab.
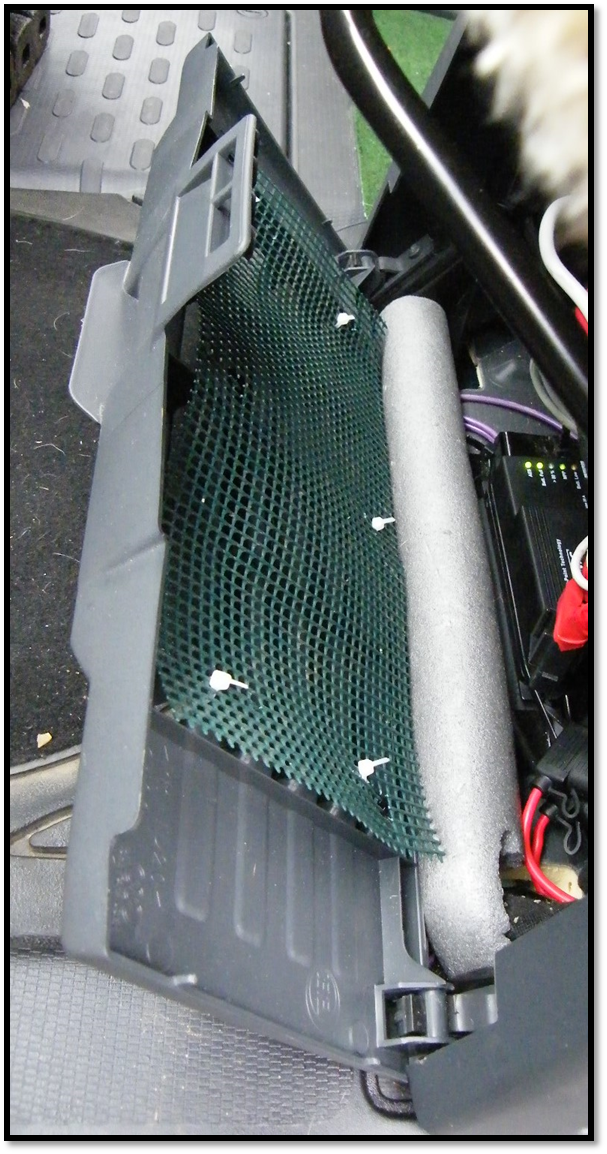
On the inside of the front of the cab seats base flap I fastened some plastic garden mesh with cable ties and a piece of cut down foam pipe lagging - this is to prevent dog hair, fluff etc getting into the under seat areas where the electrics and batteries are. I've now fitted some on the top too.
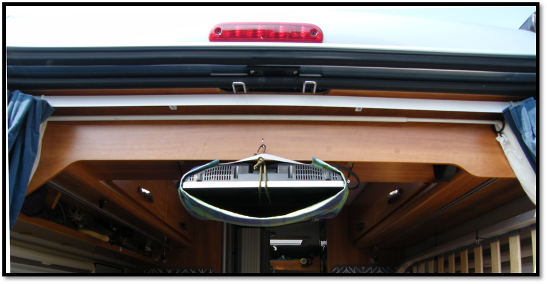
Bed blind protection
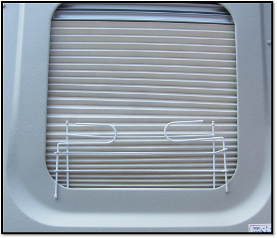
I needed to do something to stop the window blinds in the rear doors getting accidentally squished by our 'heffalumps' who like to lay at the end near them. I was going to fit the clear perspex sheets I had used in a previous camper but they were too small however whilst rummaging around I 'found' a pair of small drying racks (the sort you hang out of a window) which I'd forgotten I had. They nicely slot onto the panel surround in front of the blinds without affecting the blinds themselves - I've now taped the 'hook' arms to prevent them rattling ... and if I need to dry stuff can use them for their original purpose!
Table
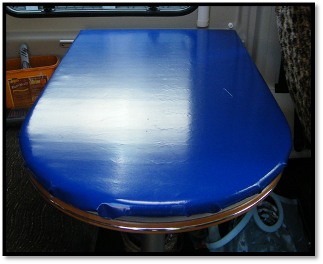
I usually remove the standard table and put in my own but had to keep the original as it has a pull out extension for the driver's seat therefore it needed to be 'protected' to prevent it getting accidentally damaged by our dogs. I cut a yoga mat to fit then taped it on with good quality gaffer tape and covered it with blue waterproof vinyl material which can be easily wiped clean, on top of this I placed a cotton tablecloth with elasticated edges to keep it in place but allows it to be removed for washing. I place a piece of plastic table cloth on top of it for meal times.
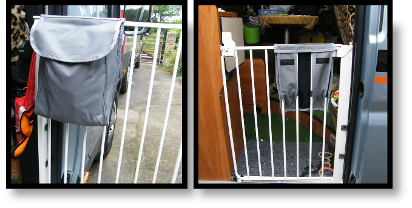
Dog Gate
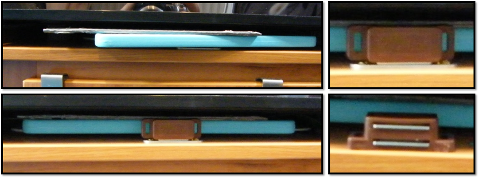
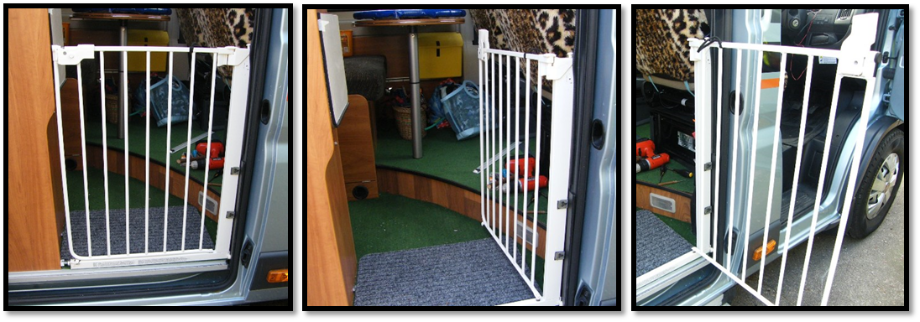
I have 3 dogs and need to keep them secure when we have the sliding door open so made a 'barrier' using a baby gate which I have adapted and works very well, can be easily removed if needs be and opens in and out. We've had a few different types of baby gate in our home to keep the dogs out of certain rooms and of these I found the Baby Dan (BD)ones to be the best as they have small lugs at the bottom of the gate (on both sides) which keeps the gates shut even when it's not 'locked' with the handle - to open the gate you just lift it slightly (we only tend to lock it when we travel or if there is a busy road nearby just to be safe).
In preparation for it's fitting I had to modify the camper slightly - I moved the kitchen worktop flap along (inwards) about an inch to allow sufficient space for the dog gate to be fitted without the flap hitting it and also moved the magnetic flap retaining catch along too. I removed the large rubber 'bump block' on the sliding door as it serves no purpose on our camper and from previous experience I found that it can get stuck in the dog gate bars if left on ... been there, done that, it's a s*d to get out!
I raided my 'bits box' of stuff I'd kept over the years and found some suitable 'U' metal brackets and other stuff to secure the gate (the brackets were originally the top mounts for a vertical blind. I also found some sticky felt pads, plastic piping etc.
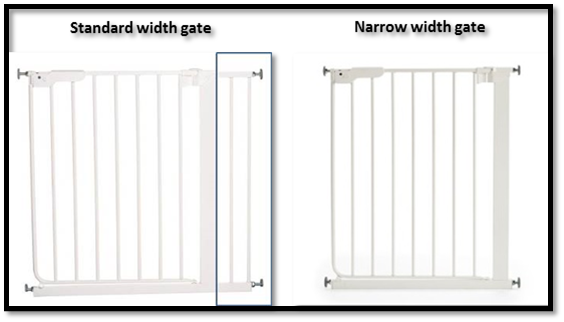
As I had a BD standard width gate I modified it to make it narrower, which entailed cutting off the extra vertical bars on the hinged size (outlined in the image) so it was flush with the thick upright (I removed any fixings/inserts which were slotted in first!); the new type narrow gate without the side piece won't need this doing as it should fit.
Due to the flyscreen and very narrow place which the gate pushes against I modified the gate further on the left opening side which entailed replacing the base 'pressure pad bolt' with a smaller headed one which fits into the lower bracket and also the one that goes into the end of the gate handle too so that it doesn't impede the use of the kitchen flap or snag the flyscreen. I also cut about 2 inches off the length of the raising part of the gate handle so it can't accidentally catch on the sliding door handle. I stuck felt pads on both bolt heads as well as on the base bar where the 'gate lugs' sit to prevent the gate rattling.
Not wanting to drill/create any more holes than necessary I utilised two existing Fiat panel securing screw on the right 'B' pillar to attach the brackets to - I replaced the original screws with longer ones and placed small spacer blocks in the recessed screw head holes to make them flush with the surface then fitted the brackets. On the inside of the brackets I stuck felt pads to keep the gate tight in them and placed some on the outside to make them look cosmetically better (not shown in photos). I screwed on a small block at the very bottom to ensure the gate can't move outwards at all and interfere with the sliding flyscreen.
On the left side at the bottom of the kitchen unit I screwed on a small metal bracket which the gate base bolt slots into, then I tightened up the nut to 'pressurise' it to make it secure. Finally on the top of the hinge side thick upright I fitted a small 'knob' and on the top of the gate 6 inches away a piece of strong elastic of a suitable length so that when the gate is opened (either inwards or outwards) the elastic can be placed over the knob to stops it accidentally closing.
When I finished the gate I fitted a storage bag which is held in place with Velcro - it works a treat for dog leads etc which we need to have easy access to.
When it comes to the time to remove the gate in the future the only trace of it ever being fitted will be the 2 small screw holes at either side of the bottom where the small bracket and block have been fitted - I could have chosen to just stick these on instead but with our heffalump of a dog 'Romy' I wanted to make sure they were attached very securely, however had I just used adhesive once cleaned off, it wouldn't leave a trace at all.
This is the second incarnation of the dog gate - in our Familyscout I fitted it the other way round and as a consequence had to secure it differently however we found it was a nuisance at times as we ended up having to 'walk round' it when it was opened inwards due to it protruding into the aisle.
Copyright: GlobecarCampscoutInfo (Mel Bucknell) 2018
Not to be reproduced without permission
Last updated: 27/7/18